This is a quick tutorial on how to set up a simple web controlled relay using Adafruit’s Huzzah ESP8266 board and Adafruit’s Latching Relay Featherwing. When you are done you will be able to open a web page while on your local network (on your phone, on your laptop, on anything with a browser) and turn lights plugged into the wall on or off.
95% of this is pieced together from other places online, but when I was piecing I couldn’t quite find it all in one place. Hence this blog post. The entire process is pretty easy as these things go.
In order to make this work you need 1) something connected to your home network that hosts the website and turns inputs on the website into action, and 2) something to translate that “action” into power going on or off. That’s the Huzzah ESP8266 board and the Latching Relay Featherwing, respectively.
Practically, you will need:
- An ESP8266 breakout board (I used the Adafruit Huzzah because I knew it would be well documented)
- A USB to TTL serial cable (I used the Adafruit one too) to program the Huzzah. Note that it will also power the board during development.
- A mictrocontroller-friendly relay (I used the Adafruit Latching Relay Featherwing)
- Some LEDs to turn on (I grabbed these).
- Some wires, a breadboard, and a soldering iron will also help
For the purposes of this project you could use pretty much anything that uses a moderate amount of electricity as the thing that is turned on (you are just creating a remote controlled switch). The most appealing features of the LEDs I chose were 1) that they plugged into the wall instead of being battery powered (relevant to the long term use I have in mind), and 2) that it was easy to access the power cord downstream from the power adapter so that the loads were less dangerous.
Programming
I very much recommend using the Adafruit tutorial for setting up the Huzzah. Once you’ve successfully blinked a light with the Arduino IDE come back here.
The code is taken from this post, which is also a great post about using the ESP8266 boards as simple web servers. The only thing I added as the CSS styling, which I’ll get to in a second.
#include <ESP8266WiFi.h>
#include <WiFiClient.h>
#include <ESP8266WebServer.h>// Replace with your network credentials
const char* ssid = “YOUR_SSID”;
const char* password = “YOUR_WIFI_PASSWORD”;ESP8266WebServer server(80); //instantiate server at port 80 (http port)
String page = “”;
int LEDUnsetPin = 0;
int LEDSetPin = 2;
void setup(void){
//the HTML of the web page
//don’t forget you need estapes (") around the quotes
page = “<style> .button{ background-color:red; color:blue; border-radius: 8px; padding: 12px 24px; }</style><h1>Simple NodeMCU Web Server</h1><p> <a href="LEDOn"><button class="button">ON</button></a> <a href="LEDOff"><button>OFF</button></a></p>”;
//make the LED pins output and initially turned off
pinMode(LEDUnsetPin, OUTPUT);
digitalWrite(LEDUnsetPin, LOW);
pinMode(LEDSetPin, OUTPUT);
digitalWrite(LEDSetPin, LOW);delay(1000);
Serial.begin(115200);
WiFi.begin(ssid, password); //begin WiFi connection
Serial.println(“”);// Wait for connection
while (WiFi.status() != WL_CONNECTED) {
delay(500);
Serial.print(“.”);
}
Serial.println(“”);
Serial.print(“Connected to ”);
Serial.println(ssid);
Serial.print(“IP address: ”);
Serial.println(WiFi.localIP());server.on(“/”, [](){
server.send(200, “text/html”, page);
});//turn on the on pin and turn off the off pin
server.on(“/LEDOn”, [](){
server.send(200, “text/html”, page);
digitalWrite(LEDUnsetPin, LOW);
digitalWrite(LEDSetPin, HIGH);
delay(1000);
});//turn off the on pin and turn on the off pin
server.on(“/LEDOff”, [](){
server.send(200, “text/html”, page);
digitalWrite(LEDUnsetPin, HIGH);
digitalWrite(LEDSetPin, LOW);
delay(1000);
});
server.begin();
Serial.println(“Web server started!”);
}void loop(void){
server.handleClient();
}
Make sure to replace “YOUR_SSID” and “YOUR_WIFI_PASSWORD” with your wifi network ssid and wifi password.
As I noted above, the only modification I made to the code was to add styling to the server. The code above isn’t the final styling - it is just a first cut to verify that the way I thought styling would work was the way that styling actually worked.
The “page=“ part of the code is the HTML for the webpage you will visit with your browser to control the lights. It may look more familiar once it is converted from a string into a more standard layout (apologies - tumblr is very bad with tabs but this may be a bit better):
<style> .button{
background-color:red;
color:blue;
border-radius: 8px;
padding: 12px 24px;
}
</style>
<h1>Simple NodeMCU Web Server</h1>
<p> <a href="LEDOn"><button class="button">ON</button></a> <a href="LEDOff"><button>OFF</button></a></p>
The links to LEDOn and LEDOff trigger the server.on functions further down in the code. Since the latching relay has two pins, each function turns off and turns on the appropriate pins on the relay so that the relay is either open or closed. If you were using a non-latching relay there would only be one pin that was either HIGH or LOW as necessary. Those pins were defined in LEDUnsetPin and LEDSetPin at the start of the code.
The nice thing about mapping LEDUnsetPin and LEDSetPin to pins 0 and 2 is that those pins are also mapped to leds on the Huzzah board. That means that you can test the sketch to make sure it works by just seeing if the lights turn from blue to red. Of course, to do that you’ll need to go to the webpage that the Huzzah is hosing.
Finding the Huzzah on the Network
In theory the serial monitor in the Arduino IDE will return a message with your Huzzah’s IP address. I found that to be a somewhat unreliable action. Instead, I just went to the connected devices section of my router and looked for it in the table. Once all of this is set up I’ll use the router to assign the Huzzah a static IP address so it is easy to find. For the development period I just track it down in the router every time.
Once you have the IP address (probably some variation of 192.168.1.X) you can just type it into your browser. If everything is going well you’ll see the webpage with two buttons (one with ugly styling):
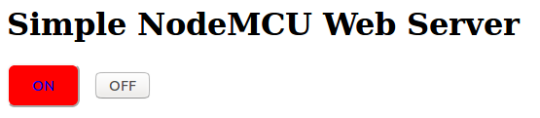
Clicking on or off will turn on a red or blue LED on the Huzzah. If that is happening things are working out just fine so far.
Hooking up the Relay
Now that the Huzzah is connected to your network, serving up a web page, and responding to clicks on that web page, it is time to connect the Huzzah to the relay.
Note that I’ve been having problems uploading scripts to the Huzzah when it is connected to the relay. That means it is probably best to have the final version of the code loaded into the Huzzah before you solder it all together (obviously you can breadboard it to your heart’s content).
There are four connections between the Huzzah and the relay to make this work. Unfortunately fritzing does not have the latching relay featherwing in its library, so we’re stuck with my description and this picture:
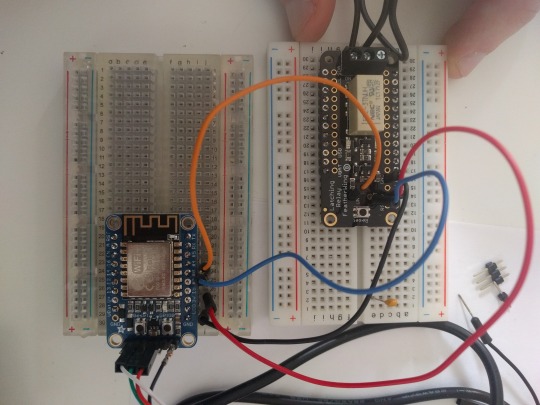
Fortunately there are only four connections so words should be able to get us most of the way.
- Connect the GND pin on the huzzah to the GND pin on the relay
- Connect the 3V pin on the huzzah to the 3V pin on the relay
- Connect the #2 pin on the huzzah to the SET pin on the relay
- Connect the #0 pin on the huzzah to the UNSET pin on the relay
Once you have that up and running try controlling it all with the webpage again. If things are working every time you click a button on the webpage you will switch the LED on the huzzah and hear a nice click from the relay.
Connecting the Relay to the Lights
The last step is to make that click impact something you care about. Cut the live wire on the LED power cable (obvious notes about electricity plugs into walls apply - make sure you know what you are doing and take appropriate precautions) and plug it into the “COM” and “NO” ports on the relay. Plug the lights into an outlet.
At this point if everything is working when you click a button on the webpage you should get
- An LED switch on the huzzah
- A satisfying click on the relay
- Lights on or off
And that’s pretty much it. At some point you’ll need to switch the power for the huzzah/relay from the computer you are using for debugging to a real power supply. I haven’t done that yet but will update when I do.