The air quality in NYC has been . . . not great this summer. This presents and opportunity. Why settle for knowing that the air is not great in the city when you can know how not-great it is in your very own home?
Wow'd by Marty McGuire's ability to check the air quaility of his apartment on his phone, I decided I would copy him by building a worse implementation of his setup. The features of my version of this setup include:
- Check the PM2.5 levels in my apartment
- Check the local AQI
- Display the PM2.5 and AQI levels with LEDs
- Display the PM2.5 and AQI levels on a screen
- Chart the curent and historical PM2.5 levels on a website that I can access with my phone outside the house
In order to make this happen I needed:
- 1 Adafruit FunHouse (this is the brains of the operation)
- 1 Adafruit PMSA003I Air Quality Breakout (this is the air sensor)
- 1 cable to connect them
- 1 USB C cable to transfer data/power it
- 1 power block that matches the USB C cable
- 1 3D printed case (optional)
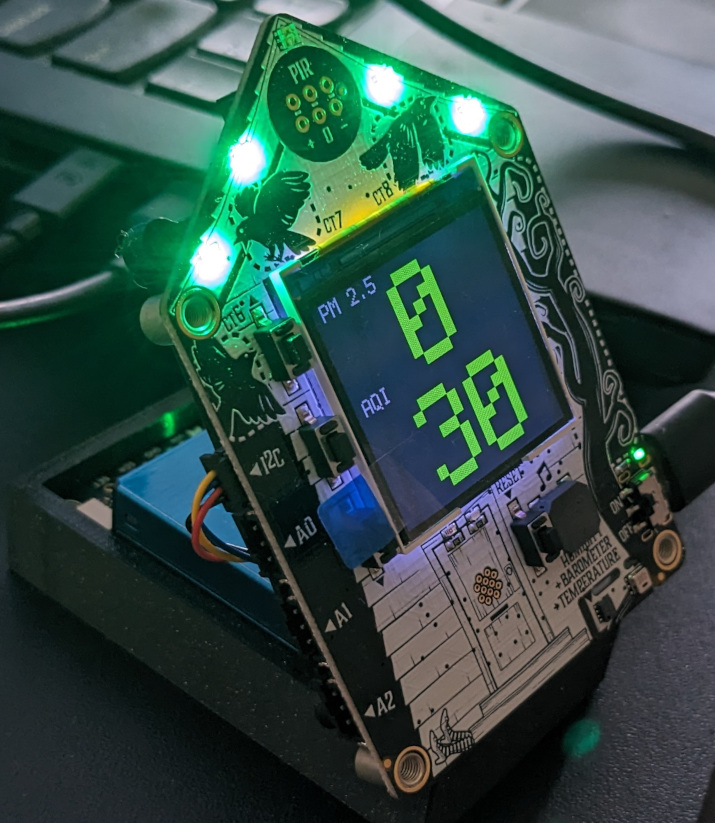
The process is pretty straightforward. Every few minutes, the board checks the PM2.5 level. It then changes the LEDs at the top of the FunHouse accordintly, displays the number on the screen, and uploads the data to an Adafruit IO dashboard. At the same time, it also pulls the local AQI levels from the AQI API and updates the LEDs and screen accordingly.
The entire script is available in this repo. In addition to the script you will need:
- The library files, which are also in the repo (make sure everything in the /lib folder in the repo is in the /lib folder on the board)
- A secrets.py file to hold your wifi and Adafruit IO credentials. You can learn how to create that here.
- A seperate keys.py file. This is for the AQI API. I'm sure there's a way to incorporate this into the secrets.py file, but I couldn't quite figure out the syntax. In any event, the entire contents of the file is
AQI_URL = "the_url_with_your_api_key". You can create your URL by playing around with the AirNow API.
The Code
Here's a walkthrough of the code.
This first block just imports all of the libraries and sets up the FunHouse object. If you are running into problems with libraries, make sure you have the library in you /lib folder on the device.
import time
import board
import busio
from digitalio import DigitalInOut, Direction, Pull
from adafruit_pm25.i2c import PM25_I2C
from adafruit_funhouse import FunHouse

#for the external API
import adafruit_requests as requests
import keys
import socketpool
import ssl
import wifi

#for the light sensor mapping
from adafruit_simplemath import map_range


reset_pin = None

funhouse = FunHouse(default_bg=None)
The next chunk creates a few more objects, turns on wifi, and sets up variables for the AQI download. It uses the existing funhouse network elements to set up the requests object.
# Create library object, use 'slow' 100KHz frequency!
i2c = board.I2C()
# Connect to a PM2.5 sensor over I2C
pm25 = PM25_I2C(i2c, reset_pin)

print("Found PM2.5 sensor, reading data...")

# Turn on WiFi
funhouse.network.enabled = True
print("wifi on")
# Connect to WiFi
funhouse.network.connect()
print("wifi connected")

#these variables sets up the requests
pool = socketpool.SocketPool(wifi.radio)
requests = funhouse.network._wifi.requests
These are the variables for the various sensor readings.
#IO Stuff
FEED_2_5 = "2pointfive"
TEMP_FEED = "temp"
HUM_FEED = "humidity"
TEMPERATURE_OFFSET = (
    3  # Degrees C to adjust the temperature to compensate for board produced heat
)
These are the RGB color values as variables to make them slightly easier to work with.
#Colors
BLACK = (0,0,0)
GREEN = (0,228,0)
YELLOW = (255, 255, 0)
ORANGE = (255,40,0)
RED = (255,0,0)
PURPLE = (143,63,151)
MAROON = (126,0,35)
This next bit creates the text blocks that will be used to display the readings. The first and third ones are the reading labels. The second and fourth are the actual readings. They are much larger. The last line pushes them to the screen.
#text
funhouse.display.show(None)
pm_label = funhouse.add_text(
    text_scale = 2, text_position = (10,10), text_color = 0x606060
)
pm_value = funhouse.add_text(
    text_scale = 12, text_position = (90,60), text_color = 0x606060
)
aqi_label = funhouse.add_text(
    text_scale = 2, text_position = (10,110), text_color = 0x606060
)
aqi_value = funhouse.add_text(
    text_scale = 12, text_position = (60,180), text_color = 0x606060
)
funhouse.display.show(funhouse.splash)
With all of that set up, the rest of the code is in a While loop that just runs forever.
First, it reads the PM2.5 data from the sensor
try:
    aqdata = pm25.read()
    # print(aqdata)
except RuntimeError:
    print("Unable to read from sensor, retrying...")
    continue
Then it pushes the PM2.5, temp, and humidity data to Adafruit IO. The temp and humidity come from sensors that are built into the FunHouse.
# Push to IO using REST
    try:
        funhouse.push_to_io(FEED_2_5, aqdata["pm25 env"])
        funhouse.push_to_io(TEMP_FEED, funhouse.peripherals.temperature - TEMPERATURE_OFFSET)
        funhouse.push_to_io(HUM_FEED, funhouse.peripherals.relative_humidity)
        print("data pushed")
    except:
        print("error uploading data, moving on")
This section downloads the AQI data from the API. It reads the target URL from the keys.py file, downloads the payload, parses the json, and assigns the AQI value to a new variable. The AQI API website is not the most user friendly UX in the world, but I did end up narrowing my query down to a single monitoring station. AQI will be set to 0 if there is an error, which will serve as a signal that something is wrong.
    # get remote AQI data
    # #https://learn.adafruit.com/adafruit-funhouse/getting-the-date-time
    target_URL = keys.AQI_URL

    try:
        response = requests.get(target_URL, timeout = 10)
        #print(response)
        jsonResponse = response.json()
        print(jsonResponse[0]["AQI"])
        currentAQI = jsonResponse[0]["AQI"]
    except:
        currentAQI = 0
        print('request failed')
The next section sets the text on the display. The labels are just one line each to set the text.
The actual reading display is more complicated. Using the AirNow AQI calculation data sheet, the if/elif statements set the color of the reading to match the alert color.
   #text stuff
   #set the label
   funhouse.set_text("PM 2.5", pm_label)
   #set the color for the pm2.5 reading
   if aqdata["pm25 env"] <= 12.0:
       funhouse.set_text_color(GREEN, pm_value)
   elif 12.0 < aqdata["pm25 env"] <= 35.4:
       funhouse.set_text_color(YELLOW, pm_value)
   elif 35.4 < aqdata["pm25 env"] <= 55.4:
       funhouse.set_text_color(ORANGE, pm_value)
   elif 55.4 < aqdata["pm25 env"] <= 150.4:
       funhouse.set_text_color(RED, pm_value)
   elif 15.4 < aqdata["pm25 env"] <= 250.4:
       funhouse.set_text_color(PURPLE, pm_value)
   elif 25.4 < aqdata["pm25 env"] <= 500.4:
       funhouse.set_text_color(MAROON, pm_value)
   #set the reading
   funhouse.set_text(aqdata["pm25 env"], pm_value)
   #set the aqi label
   funhouse.set_text("AQI", aqi_label)
   #set the aqi color
   if currentAQI <= 50.0:
       funhouse.set_text_color(GREEN, aqi_value)
   elif 50.0 < currentAQI <= 100:
       funhouse.set_text_color(YELLOW, aqi_value)
   elif 100 < currentAQI <= 150:
       funhouse.set_text_color(ORANGE, aqi_value)
   elif 150 < currentAQI <= 200:
       funhouse.set_text_color(RED, aqi_value)
   elif 200 < currentAQI <= 300:
       funhouse.set_text_color(PURPLE, aqi_value)
   elif 300 < currentAQI <= 500:
       funhouse.set_text_color(MAROON, aqi_value)
   funhouse.set_text(currentAQI, aqi_value)
After working through the display, things move on to the five LEDs built into the top of the FunHouse. First I create variables and set them all to off.
    #LED Stuff
    #https://www.airnow.gov/sites/default/files/2020-05/aqi-technical-assistance-document-sept2018.pdf
    #set all of the LEDs to black by default
    led_0 = BLACK
    led_1 = BLACK
    led_2 = BLACK
    led_3 = BLACK
    led_4 = BLACK
    print ("2.5 = " + str(aqdata["pm25 env"]))
Then the first two are updated based on the local PM2.5 reading and the last two are updated based on the local AQI.
    #update first two leds depending on the 2.5 reading
    if aqdata["pm25 env"] <= 12.0:
        led_0 = GREEN
        led_1 = GREEN
    elif 12.0 < aqdata["pm25 env"] <= 35.4:
        led_0 = YELLOW
        led_1 = YELLOW
    elif 35.4 < aqdata["pm25 env"] <= 55.4:
        led_0 = ORANGE
        led_1 = ORANGE
    elif 55.4 < aqdata["pm25 env"] <= 150.4:
        led_0 = RED
        led_1 = RED
    elif 15.4 < aqdata["pm25 env"] <= 250.4:
        led_0 = PURPLE
        led_1 = PURPLE
    elif 25.4 < aqdata["pm25 env"] <= 500.4:
        led_0 = MAROON
        led_1 = MAROON

    #update the last two LEDs based on AQI
    if currentAQI <= 50.0:
        led_3 = GREEN
        led_4 = GREEN
    elif 50.0 < currentAQI <= 100:
        led_3 = YELLOW
        led_4 = YELLOW
    elif 100 < currentAQI <= 150:
        led_3 = ORANGE
        led_4 = ORANGE
    elif 150 < currentAQI <= 200:
        led_3 = RED
        led_4 = RED
    elif 200 < currentAQI <= 300:
        led_3 = PURPLE
        led_4 = PURPLE
    elif 300 < currentAQI <= 500:
        led_3 = MAROON
        led_4 = MAROON
Finally, the new colors are pushed to the LEDs themselves
    #update the LEDs
    funhouse.peripherals.set_dotstars(led_0, led_1, led_2, led_3, led_4)
The LEDs are pretty bright. That's helpful during the day, but it is a bit much at night. The next bit dims the LEDs based on ambient light. It uses the light sensor built into the FunHouse and maps the readings to a 0-1 scale, which is the scale used to control the brightness of the LEDs.
It is possible control the brightness of the LEDs individually (the syntax is (R,G,B,Brightness)), but in this case I want all of them to be the same level.
    #set LED brightness so they aren't super bright at night
    #map_range works (inputnumber, orig min, orig max, new min, new max)
    #right reading bounds appear to be ~1800-54000, real world is closer to 1800-5000)
    #goal here is to make the lights bright when it is bright and dim when it is dark
    brightness = map_range(funhouse.peripherals.light, 1800, 6000, 0, 1)
    print(brightness)
    funhouse.peripherals.dotstars.brightness = brightness
Finally, everything just waits for 2 minutes before starting over again.
time.sleep(120)