
This post originally appeared on the OSHWA blog.
Read More...
Unlocking 3D Printer Hearing at the US Copyright Office
I originally wrote this post on April 14, immediately after the hearing it describes. At the time I assumed that the video of the proceeding would be released soon, so I held it in drafts until I could add the relevant videos. As it is now early July, I decided to post what I have as is. I’ll add the videos if/when the Copyright Office ever posts them.
Read More...Pi Powered MTA Subway Alerts
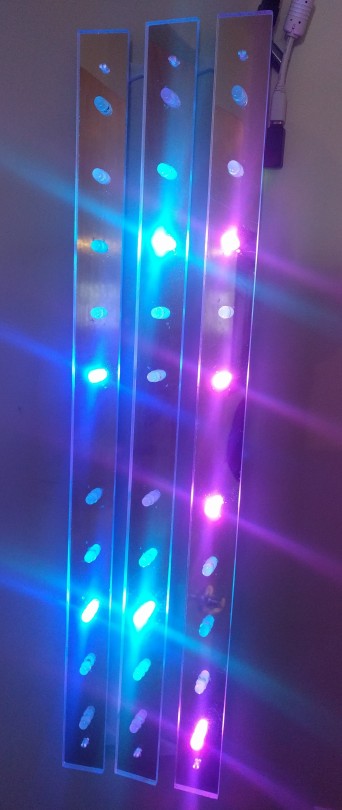
This project is designed to answer the question “if I leave my house now, how long will I have to wait for my subway train?” One way to answer that question is “if you leave right now you won’t have to wait at all”.
The project uses a raspberry pi zero to connect the NYC MTA real time arrival data with neopixels. The neopixels give you an indication of how far trains are away from the station. Importantly, the alerts are not based on the absolute time until the train arrives at the station (”A train will arrive at the station in 5 minutes”). Instead, the alerts are aware of how long it takes to walk to the station from my apartment and are therefore based on the time from the station when you get there (”If you leave now and walk to the station, there will be a train arriving in the station 5 minutes after you get there.”).
A few quick notes before getting into the details. First, the way you arrange the indicator lights is essentially arbitrary. We happened to abstract them out into strips. However, you could do spirals or overlay them on a map or whatever you want. Second, and speaking of maps, this project builds on the never quite finished metro-and-bikeshare map project from when I lived in DC. That one combines reading from the WMATA api and the DC bikeshare API with an eye towards lights integrated into a map. If you are in DC it may or may not be helpful for you. Third, the parts of this that parse the MTA’s API is 100% reliant on Chris Griffin’s real time countdown subway display. The NYC subway API is more robust than DC’s, which means it is like a million times harder to parse if you (like me) don’t know what you are doing. Chris’ code made everything a lot easier.
The basic outline of the project is as follows:
- Poll the MTA API to find out when trains will arrive at your station
- Pull out the trains you care about
- Assign them to the relevant indicator lights
- Repeat
Bill of Materials
- Rasbperry Pi Zero W (you’ll need a power supply too)
- Neopixels (however many lights you want)
- Diodes (you only need one)
- 0.1uF capacitors (I used 1 for ever 4 neopixels)
- 4700uF capacitor
- Female DC power adapter
- Wires
- Some sort of pushbutton (if you want the pause feature)
If you decide to go with the physical layout I used you will also need
- Mirrored acrylic (I got mind at Canal Plastics)
- The brackets (available in the repo and on thingiverse)
Software
I’m assuming you already have your pi connected to your home network to get this rolling. One thing that I did discover is that you can transfer an SD card from a regular pi to a pi zero. That allowed me to prototype this entire thing on a full sized pi (with headers) before shifting it onto the zero.
Tumblr is bad at formatting code so I’ll just point to the github repo here for the entire code. I’ll use this section to walk through important parts of the code.
#variables to hold the lists
arrival_times_york_south = []
arrival_times_york_north = []
arrival_times_high_south_a = []
arrival_times_high_north_a = []
arrival_times_high_south_c = []
arrival_times_high_north_c = []
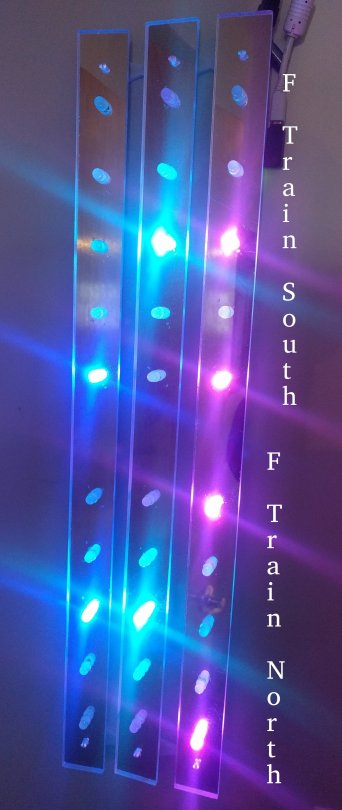
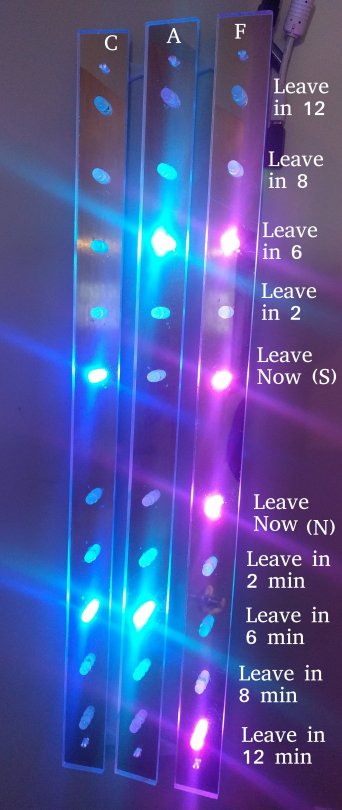
This section creates the station lists. For my purposes I care about three stations: York, High Street (A line), and High Street (C line). Each station has two directions. Modify these as relevant for the stations you care about.
#variables to hold the station IDs
HighS = [‘A40S’]
HighN = ['A40N’]
YorkS = ['F18S’]
YorkN = ['F18N’]
These hold the UIDs for the stations within the MTA API. Someone made a helpful heroku app to help you find the ids that you care about.
#variables to hold the walk times
HighWalk = 13
YorkWalk = 7
This is how long it takes you to walk to the station. This is used to customize the alert time for your location.
def grabber(station_ID, station_URL, station_line):
This function adds the arrival times to the station for every train that is in they system. Since the MTA API has data for when every train running will reach every station, the output here can be a dozen or so numbers that are as high as 60 minutes out.
def lighter(arrival_list, time_start, light_one, light_two, light_three, light_four, light_five, line_R, line_G, line_B):
This function decides which of the neopixels to turn on. “arrival_list” is the output from grabber, “time_start” will be how long it takes to walk to the station, the “light_x” is the the neopixels associated with that station in that direction, and “line_X” are the RGB colors associated with the line. The idea here is that you tell the function when trains are coming, how to correct those arrival times for you walking to the station, what the indicator lights are, and what color they should be when they are on.
The block of if statements in this function that start with
if int(item) == time_start:
decide what these lights mean. I decided to make five lights for each direction. They are:
- leave now
- 1-2 minutes until leave now
- 3-4 minutes until leave now
- 5-7 minutes until leave now
- 8-12 minutes until leave now
These are relatively arbitrary categories can you can change them so that they work for you. As noted above, the basic idea is to get a sense of how long you have until you need to leave and how many trains are coming reasonably soon. Note that the lights can’t tell the difference between 1 train being in a category and 2 or more trains being in that category. Also, I suppose this is where I should mention that these lights are only as accurate as the MTA info they are based on.
def blackout():
This function turns off the lights at night. It has slightly different times for weekdays and weekends.
def pause_button(channel):
This function is for a pause button that temporarily turns off the lights during a time when they would otherwise be on. I don’t know if I’m going to use it (as of this moment the off time is set to 30 seconds) but if the lights are somewhere that you’ll want to be able to shut them off for random reasons this allows you to do so.
while True:
Having built these functions, this loop actually runs them. It ends by pausing for 5 seconds. This is a shorter amount of time than necessary and was originally 30 seconds (this probably doesn’t need to be updated more than once a minute). However, I’ve found that the actual downloading and parsing of the MTA data can take 15-20 seconds (sometimes even more) so I shortened it to 5 seconds.
Hardware
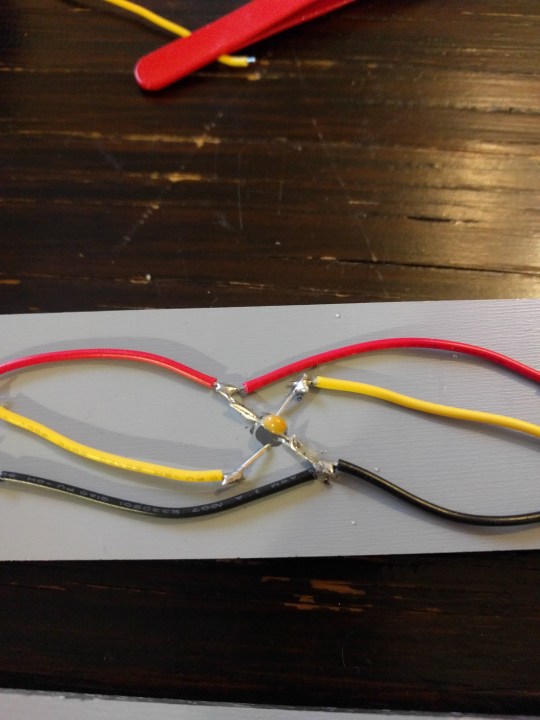
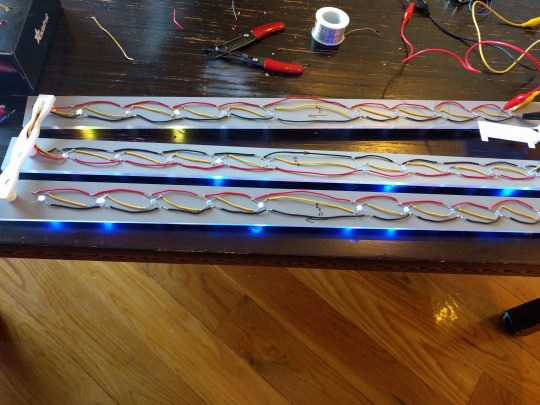
Here’s the wiring diagram:

I ended up putting the diodes every fourth neopixel.
After drilling the holes in the acrylic sheet I put the neopixel through the hole and soldered in the wires:
Here’s an image of all of them chained together:
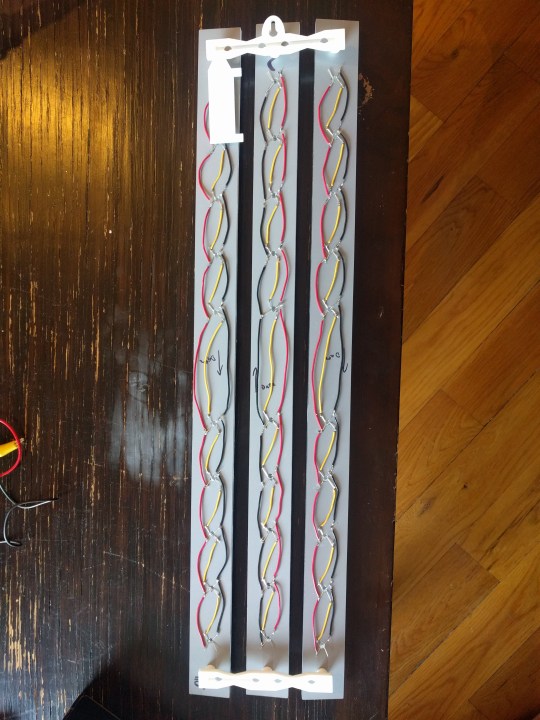
Wired together with the harness:
And soldered in with the pi:

And that’s more or less it. Once you have things connected to your network just pick a place to hag it up. Now you may or may not be late to a subway train again, depending on the accuracy of the MTA API data.
Read More...Stratasys Opposes Unlocking 3D Printing Petition
Update 3/15/18: I filed this brief reply to Stratasys’ comments in the proceeding as well. This blog post is a better reply.
I was kind of hoping that this wouldn’t happen, but has Stratasys filed an opposition to my request to make it easier to unlock 3D printers. The background is here, but the short version is that the petition is about making it clear that copyright law should not prevent people from using third party materials in their 3D printers. If you read that and thought to yourself “why would copyright law prevent someone from using third party material in their 3D printer?” you have arrived at the crux of this issue. You have also grasped something that Stratasys appears to have missed. From its opposition, Stratasys appears to believe that copyright law is well suited to industrial health and safety, preventing airplanes from falling out of the sky, and keeping out hackers.
To be clear (again, background) on its face this petition, which is in front of the US Copyright Office as part of the “1201 Triennial” process is pretty narrow. It is only about removing qualifying language from an existing rule that clarifies that using third party materials in 3D printers does not violate copyright law. The problem with the qualifying language is that it is highly ambiguous and could be read to swallow the entire rule. Since the qualifying language appears to be intended to address a concern that does not actually exist, it should be safe to remove it.
Stratasys’ Opposition
Stratasys explicitly does not oppose renewing that existing rule on unlocking 3D printers to use third party materials (the rule needs to be renewed every three years - hence the “Triennial”). However, Stratasys opposes removing the qualifying language from that rule. Unfortunately, its opposition does not really address the qualifying language (which is probably good because Stratasys effectively advised against inserting the language three years ago).
Instead Stratasys’ opposition quasi-re-litigates the original exemption, defends the concept of closed systems as a thing, and urges the Copyright Office to address selected ills of the world. The opposition never addresses one of the key points of the petition: to eliminate copyright law from any discussion about third party materials in 3D printers because copyright law does not belong there.
I’m not going to dwell on that first section of the opposition. It is strange to me that Stratasys spends time trying to re-litigate the terms of an exemption that it does not oppose, but Stratasys does not appose the renewed exemption so that’s Stratasys’ problem. Stratasys also raises a number of procedural arguments that every opponent of every exemption always raises. While I appreciate the liberal use of italics to show which party properly carriers which burdens in those sections, it isn’t worth dwelling on those here either.
Instead, I want to focus on what I see as the real problem with the opposition. That’s Stratasys’ belief that copyright law should be used for things that are totally unrelated to the purpose of copyright law.
Copyright Law Should Protect Industrial Supply Chains?
Stratasys first argues that closed industrial systems have significant benefits. For the purposes of this discussion I will note, but not dwell upon, the fact that Stratasys seems unable to conceive of a world where an informed operator of a 3D printer weighs the value of closed industrial systems against the value of third party materials for their printer and concludes that they prefer third party materials.
Stratasys describes three benefits of closed systems in commercial applications:
- “The ability to consistently produce outputs that match established benchmarks by controlling system inputs”
- “A closed-loop feedback process that produces real-time quality and performance data to pinpoint performance issues and speed innovation”
- “Steady improvement in reliability and service levels permitting expansion to new classes of customers”
These benefits have a few things in common. The most obvious is that they are concerns that are completely beyond the scope of copyright law. A related similarity is that they are unrelated to protecting the software that runs 3D printers from infringement. A nexus with the purpose of copyright law would be the type of thing you might expect an opponent to raise in this type of proceeding. Stratasys appears unable to find one here.
Copyright Law Should Protect Airplane Safety?
Airplane safety was actually raised in the 2015 round of this proceeding, although it was largely abandoned by the time the final exemptions were issued. In this opposition, Stratasys details the work it has done to create the “Aircraft Interior Certification Solution” to provide “aerospace companies with a detailed verification process that tracks down the material and standards needed to install 3D printed parts in aircraft.”
That’s great! However, the integrity of components in airplane parts is totally unrelated to copyright law. We have a number of other regulatory regimes (and regulatory agencies - more on that below) specifically dedicated to making sure planes are safe. Which is good because a law passed to make it harder to rip DVDs is ill suited for that purpose.
Copyright Law Should Protect Occupational Safety And Cybersecurity?
Similarly, Stratasys points out that it has created closed systems to address the “need to mitigate risks involved in the use of a specific material, such as fire hazards or hazardous fumes.” This could be a pretty compelling reason for someone to not hack their 3D printer and change all the settings. It is totally unrelated to copyright law.
Stratasys also raises the specter of some sort of cybersecurity catastrophe, stating that “[a] 3D printer in a commercial setting with compromised or disabled TPMs would likely be more vulnerable to hackers, disgruntled employees, and other malicious actors.” Again, this may or may not be true. But we have entire branches of law designed to address hackers, disgruntled employees, and other malicious actors. In the context of any one of those groups monkeying with the settings on a 3D printer, copyright law is not one of those branches.
The Copyright Office Should Regulate Everything To Relieve Other Agencies of Their Burdens
This is probably my favorite argument. Stratasys describes my argument that the Copyright Office should stick to its knitting and leave things like regulating medical device safety to other expert agencies in this way:
“In essence, Petitioners want the Copyright Office to pass the buck, putting the burden on other agencies to anticipate and regulate the hacking of 3D printers.”
This characterization of my desires is totally accurate. I believe that we have government agencies besides the Copyright Office for a reason and that those agencies should decide how to handle the problems within their purview.
Stratasys actually describes exactly this concept of other agencies deciding how to handle the problems within their purview, although it attempts to frame the behavior as some sort of doomsday scenario:
“This would force federal agencies not only to grapple with the changes brought by 3D printers, but to contemplate scenarios where TPMs are legally circumvented, and possibly to pass new regulations to ban the circumvention of TPMs on 3D printers within their regulatory arena.”
(note that if the TPM - that’s DRM or digital lock - was circumvented for a purose other than using third party material in the printer, such a circumvention would fall beyond the scope of this exemption).
I agree with this vision of the future as well. Federal agencies should be forced to grapple with the changes brought by 3D printers within their regulatory arena. That is what we pay them to do. In fact, Stratasys immediately goes on to cite an example where the FDA ran a multi-year process to grapple with changes brought by 3D printing and then issued guidance within its area of regulatory expertise.
Stratasys’ kicker to this point is kind of beautiful: “In the current environment, this [agencies grappling with challenges and addressing them with regulation] would be a challenge to accomplish” (citing here as evidence).
What Now?
Where does this leave us? One of the major purposes of this entire process was to try and keep copyright law out of an area where it had no business. Stratasys’ opposition - presumably its strongest argument - effectively gives up the game. Its arguments are far removed from the world of copyright law because they have to be. Within the narrow context of copyright law there is no reason to object to this exemption request.
The next stop is will be hearings in DC on this petition in the spring. In the meantime, keep on eye on organizations like Public Knowledge. They (along with a number of other advocacy organizations and law school clinics) are helping to organize ways for everyone to get involved in this process.
Read More...Control LED Lights With A Webpage (ESP8266 Relay)
This is a quick tutorial on how to set up a simple web controlled relay using Adafruit’s Huzzah ESP8266 board and Adafruit’s Latching Relay Featherwing. When you are done you will be able to open a web page while on your local network (on your phone, on your laptop, on anything with a browser) and turn lights plugged into the wall on or off.
95% of this is pieced together from other places online, but when I was piecing I couldn’t quite find it all in one place. Hence this blog post. The entire process is pretty easy as these things go.
In order to make this work you need 1) something connected to your home network that hosts the website and turns inputs on the website into action, and 2) something to translate that “action” into power going on or off. That’s the Huzzah ESP8266 board and the Latching Relay Featherwing, respectively.
Practically, you will need:
- An ESP8266 breakout board (I used the Adafruit Huzzah because I knew it would be well documented)
- A USB to TTL serial cable (I used the Adafruit one too) to program the Huzzah. Note that it will also power the board during development.
- A mictrocontroller-friendly relay (I used the Adafruit Latching Relay Featherwing)
- Some LEDs to turn on (I grabbed these).
- Some wires, a breadboard, and a soldering iron will also help
For the purposes of this project you could use pretty much anything that uses a moderate amount of electricity as the thing that is turned on (you are just creating a remote controlled switch). The most appealing features of the LEDs I chose were 1) that they plugged into the wall instead of being battery powered (relevant to the long term use I have in mind), and 2) that it was easy to access the power cord downstream from the power adapter so that the loads were less dangerous.
Programming
I very much recommend using the Adafruit tutorial for setting up the Huzzah. Once you’ve successfully blinked a light with the Arduino IDE come back here.
The code is taken from this post, which is also a great post about using the ESP8266 boards as simple web servers. The only thing I added as the CSS styling, which I’ll get to in a second.
#include <ESP8266WiFi.h>
#include <WiFiClient.h>
#include <ESP8266WebServer.h>// Replace with your network credentials
const char* ssid = “YOUR_SSID”;
const char* password = “YOUR_WIFI_PASSWORD”;ESP8266WebServer server(80); //instantiate server at port 80 (http port)
String page = “”;
int LEDUnsetPin = 0;
int LEDSetPin = 2;
void setup(void){
//the HTML of the web page
//don’t forget you need estapes (") around the quotes
page = “<style> .button{ background-color:red; color:blue; border-radius: 8px; padding: 12px 24px; }</style><h1>Simple NodeMCU Web Server</h1><p> <a href="LEDOn"><button class="button">ON</button></a> <a href="LEDOff"><button>OFF</button></a></p>”;
//make the LED pins output and initially turned off
pinMode(LEDUnsetPin, OUTPUT);
digitalWrite(LEDUnsetPin, LOW);
pinMode(LEDSetPin, OUTPUT);
digitalWrite(LEDSetPin, LOW);delay(1000);
Serial.begin(115200);
WiFi.begin(ssid, password); //begin WiFi connection
Serial.println(“”);// Wait for connection
while (WiFi.status() != WL_CONNECTED) {
delay(500);
Serial.print(“.”);
}
Serial.println(“”);
Serial.print(“Connected to ”);
Serial.println(ssid);
Serial.print(“IP address: ”);
Serial.println(WiFi.localIP());server.on(“/”, [](){
server.send(200, “text/html”, page);
});//turn on the on pin and turn off the off pin
server.on(“/LEDOn”, [](){
server.send(200, “text/html”, page);
digitalWrite(LEDUnsetPin, LOW);
digitalWrite(LEDSetPin, HIGH);
delay(1000);
});//turn off the on pin and turn on the off pin
server.on(“/LEDOff”, [](){
server.send(200, “text/html”, page);
digitalWrite(LEDUnsetPin, HIGH);
digitalWrite(LEDSetPin, LOW);
delay(1000);
});
server.begin();
Serial.println(“Web server started!”);
}void loop(void){
server.handleClient();
}
Make sure to replace “YOUR_SSID” and “YOUR_WIFI_PASSWORD” with your wifi network ssid and wifi password.
As I noted above, the only modification I made to the code was to add styling to the server. The code above isn’t the final styling - it is just a first cut to verify that the way I thought styling would work was the way that styling actually worked.
The “page=“ part of the code is the HTML for the webpage you will visit with your browser to control the lights. It may look more familiar once it is converted from a string into a more standard layout (apologies - tumblr is very bad with tabs but this may be a bit better):
<style> .button{
background-color:red;
color:blue;
border-radius: 8px;
padding: 12px 24px;
}
</style>
<h1>Simple NodeMCU Web Server</h1>
<p> <a href="LEDOn"><button class="button">ON</button></a> <a href="LEDOff"><button>OFF</button></a></p>
The links to LEDOn and LEDOff trigger the server.on functions further down in the code. Since the latching relay has two pins, each function turns off and turns on the appropriate pins on the relay so that the relay is either open or closed. If you were using a non-latching relay there would only be one pin that was either HIGH or LOW as necessary. Those pins were defined in LEDUnsetPin and LEDSetPin at the start of the code.
The nice thing about mapping LEDUnsetPin and LEDSetPin to pins 0 and 2 is that those pins are also mapped to leds on the Huzzah board. That means that you can test the sketch to make sure it works by just seeing if the lights turn from blue to red. Of course, to do that you’ll need to go to the webpage that the Huzzah is hosing.
Finding the Huzzah on the Network
In theory the serial monitor in the Arduino IDE will return a message with your Huzzah’s IP address. I found that to be a somewhat unreliable action. Instead, I just went to the connected devices section of my router and looked for it in the table. Once all of this is set up I’ll use the router to assign the Huzzah a static IP address so it is easy to find. For the development period I just track it down in the router every time.
Once you have the IP address (probably some variation of 192.168.1.X) you can just type it into your browser. If everything is going well you’ll see the webpage with two buttons (one with ugly styling):
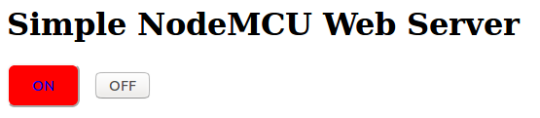
Clicking on or off will turn on a red or blue LED on the Huzzah. If that is happening things are working out just fine so far.
Hooking up the Relay
Now that the Huzzah is connected to your network, serving up a web page, and responding to clicks on that web page, it is time to connect the Huzzah to the relay.
Note that I’ve been having problems uploading scripts to the Huzzah when it is connected to the relay. That means it is probably best to have the final version of the code loaded into the Huzzah before you solder it all together (obviously you can breadboard it to your heart’s content).
There are four connections between the Huzzah and the relay to make this work. Unfortunately fritzing does not have the latching relay featherwing in its library, so we’re stuck with my description and this picture:
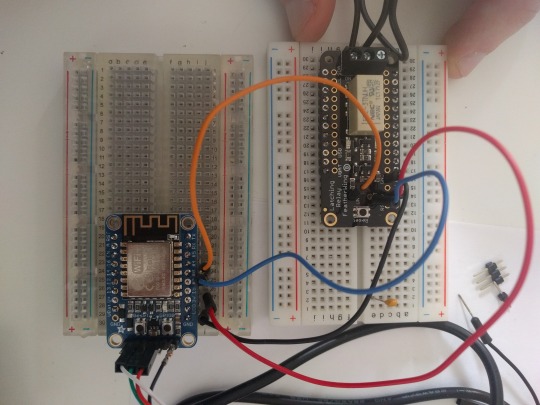
Fortunately there are only four connections so words should be able to get us most of the way.
- Connect the GND pin on the huzzah to the GND pin on the relay
- Connect the 3V pin on the huzzah to the 3V pin on the relay
- Connect the #2 pin on the huzzah to the SET pin on the relay
- Connect the #0 pin on the huzzah to the UNSET pin on the relay
Once you have that up and running try controlling it all with the webpage again. If things are working every time you click a button on the webpage you will switch the LED on the huzzah and hear a nice click from the relay.
Connecting the Relay to the Lights
The last step is to make that click impact something you care about. Cut the live wire on the LED power cable (obvious notes about electricity plugs into walls apply - make sure you know what you are doing and take appropriate precautions) and plug it into the “COM” and “NO” ports on the relay. Plug the lights into an outlet.
At this point if everything is working when you click a button on the webpage you should get
- An LED switch on the huzzah
- A satisfying click on the relay
- Lights on or off
And that’s pretty much it. At some point you’ll need to switch the power for the huzzah/relay from the computer you are using for debugging to a real power supply. I haven’t done that yet but will update when I do.
Read More...