This article was originally published on Makezine.com.
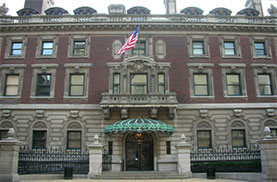
Recently, the Cooper Hewitt Smithsonian Design Museum released detailed 3D scan data for its home. And it has a pretty nice home. The museum, which is located in Manhattan and is dedicated to historic and contemporary design, is housed in the former mansion of Andrew Carnegie. Built around the turn of the last century when Carnegie was arguably the richest man in the world, the mansion itself makes Cooper Hewitt worth the visit. Now, you can just download the files and visit the mansion from the comfort of your sofa.
That in and of itself is a pretty cool thing and would probably be worth a stand alone blog post. Being able to download one of the world’s historic buildings, peek around at your leisure, and 3D print it however you want is fairly amazing. But that’s not really what this blog post is about.
Instead, this post is about how the Cooper Hewitt decided to make the mansion available to the public. Specifically, how they went out of their way to encourage people to do interesting things with the files without restriction. Hopefully, it will begin to serve as a model for other institutions working to make scans available to the public.
Let’s break down exactly what Cooper Hewitt did right:
Make it Clear That the File is Available

Let’s start at the top. This isn’t a look-but-don’t-touch page with some jankyproprietary viewer that crashes your browser. Right out of the box, the page let’s you know that the mansion is here for you to download – and use outside of Cooper Hewitt’s control.
Encourage Free Remix and Reuse
This is probably the best part of the entire site. A clear, unambiguous invitation for people not only to download the file and view it, but to remix and reuse it.
Give People the Data They Need, In Ways They Can Use It 
Some people want as much data as they can get, with full color and texture. Why not set a level in your next videogame in the Carnegie Mansion? For them, there is a big FBX file available. Others are just looking to 3D print a model, and may not even have tools to easily work with the FBX file. Those users can download the STL file and get to printing.
License Permissively (Or, the One Part That Gives Me Pause)
update: Seb Chan at Cooper Hewitt explains that they used CCO because the status of 3D scan files is not necessarily clear in non-US jurisdictions and they wanted to make crystal clear that these files were not protected by copyright. That’s a pretty good reason.
This is a super-permissive license. Why does it give me pause? Because, in all likelihood, Cooper Hewitt doesn’t really hold any copyright in the file to license in the first place. The building itself is not protected by copyright, and the state of the law right now does not give people who scan an object an independent copyright in that scan. As a result, even a super-restrictive license would probably not be enforceable.
But even then, Cooper Hewitt makes it easy to overlook that concern. First they use the Creative Commons Zero license, which effectively waives all rights in the file. I would argue that such a license is redundant, but at least it doesn’t introduce potentially unenforceable restrictions into the process.
Second, Cooper Hewitt makes a bunch of reasonable requests to users. Importantly, these are not requirements backed up by a legal threat. Instead, they are just telling you what they would appreciate you do. These requests are designed to make the dataset even more useful to everyone, let people know how Cooper Hewitt would appreciate they use the data, and make it easy for other people to track down the original files if they are interested.
Make Getting in Touch Easy
Making it easy for users to get in touch greatly increases the likelihood that Cooper Hewitt will learn about how they are using the models. That should make it easier for Cooper Hewitt to prioritize the scanning of other things, and to understand what is most useful to people.
It may also help get more things scanned and available. This may not be true for Cooper Hewitt, but often neat new things happen at institutions because a handful of people within the institution are passionately advocating for it to happen. In those cases, positive feedback and information about what users are doing with the files make it easier to push for even more scanning and releasing of files.
A Great Model
The Carnegie Mansion file release is a fantastic example of how to make architectural scans available to the public in a way that truly encourages engagement. Here’s to hoping that it is the first of many. Now stop reading this post and start downloading files. And be sure to let Cooper Hewitt know if you do something neat.
Read More...


